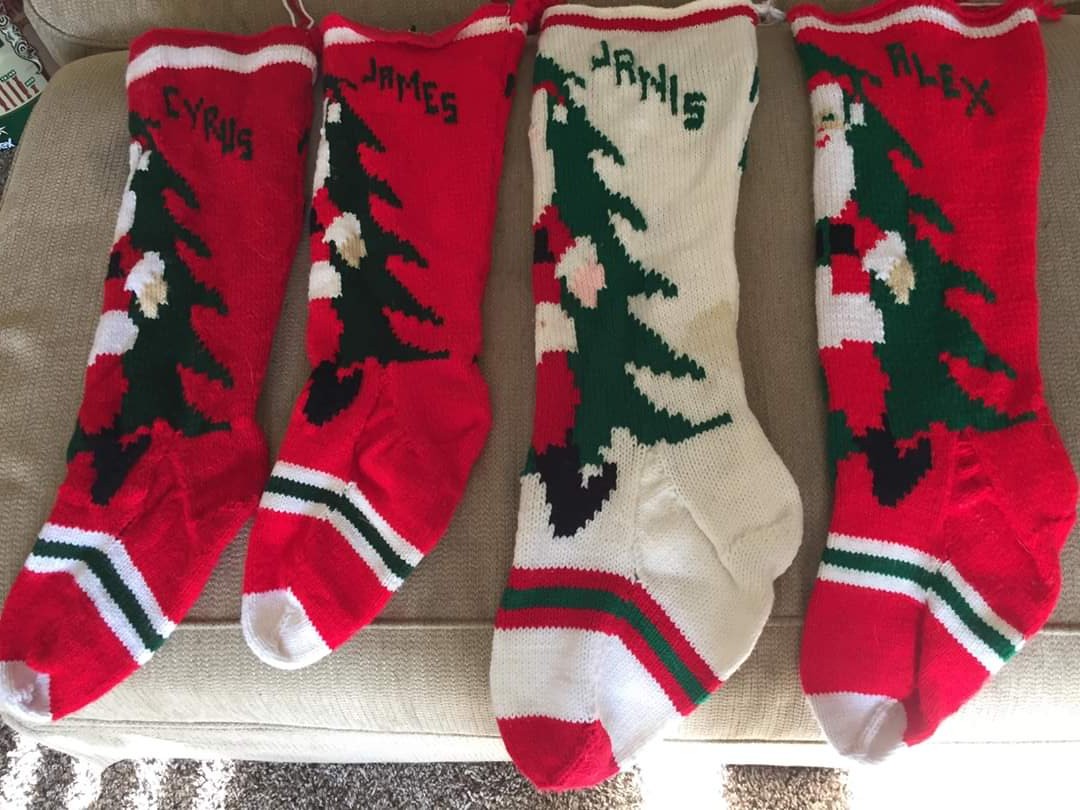
In the previous post, I shared some background on how the family stocking tradition began. This post tells how to make the stockings.
 |
| 3 complete and 2 incomplete stockings |
Printable Instructions
If you want a simple printable pattern, use this PDF for the instructions (Steps A-H) and this PDF for the image grid pattern (Steps A-B).
Sarah digitized the pattern based on the 1940s grid pattern and notes that Grandma had hand written, and the new PDF pattern is at least 10 times easier to follow than the original pattern. Sarah added numbers that make it easier to follow. You can either print it in color or shade it in after printing it in greyscale to help remember which color to use. Message me if you would like a copy of the editable spreadsheet.
 |
| Find the 2-page PDF for the image pattern grid here |
 |
| Find the 1-page PDF of the instructions here |
Sarah digitized the pattern based on the 1940s grid pattern and notes that Grandma had hand written, and the new PDF pattern is at least 10 times easier to follow than the original pattern. Sarah added numbers that make it easier to follow. You can either print it in color or shade it in after printing it in greyscale to help remember which color to use. Message me if you would like a copy of the editable spreadsheet.
 |
| The 1940s pattern with grandma's handwritten instructions |
More detailed instructions
Skills required:
- Knit stitch, purl stitch to make stockinette stitch
- Knit two together
- Mattress stitch
- Duplicate stitch
- Crochet daisy chain for hanging loop
Materials:
-4 ply yarn (worsted weight = ordinary yarn)
I used Red Heart Super Saver. Get enough of each color to finish your stocking.
- 2 ½ oz. Red (boy)/ White (girl)
- ½ oz Green
- ½ oz. White
- ½ oz. Red
- Beige (Santa face, hands)
- Black (belt- boots- face)
-Size #3 Needles
- I like 2 sets of aluminum circular needles. 29 inches long.
- If you like straight needles instead, you'll need 2 straight needles, 15 inches long, and 4-5 double pointed needles- 7 inches long
-Thread that matches to sew bias tape at top of stocking: Red (boy)/White (girl)
-Matching bias tape to keep the top from curling
- I got Wrights white Bias Tape Hem Facing (1.875" wide x 2.5 yd long) from JoAnn Fabrics and Wrights scarlet Double Fold Bias Tape Quilt Binding (0.875" wide x 3.0 yd long)
-Small crochet hook for repairs, darning needle, 2-3 stitch holders, stitch marker
-Print pattern and image, add name to pattern, Draw 3" and 8" marks on your paper for the heel flap length and foot length, respectively.
-Print pattern and image, add name to pattern, Draw 3" and 8" marks on your paper for the heel flap length and foot length, respectively.
Instructions:
A. Body:
- Cast on 90 stitches (Gauge: 8 sts=1 inch from the pattern. I actually knit 6 sts = 1 inch). For this long-tail cast on I think I've been using about 5 feet of tail.
Instructions for long-tail cast on
- Follow image pattern until row 64. Each row in the pattern image is a double row: a knit row + a purl row.
 |
| A basic idea of what each step looks like on the stocking |
 |
| Progress of the stocking body worked with straight needles. January 2017. |
Notes on switching colors in the middle of rows:
Note about how much yarn is needed for each section: for my gauge (about 6 stitches per inch), I use about a foot of yarn for every 10 stitches in the pattern (double rows). For example, to do the red for Santa's left shoulder, there are 25 stitches, so I would need a minimum of 2.5 feet of working yarn, plus a foot for 6 inches of tail on either side. I would need at least 3.5 feet of red yarn for that section. Another example: The black belt has less than 64 stitches, so I would need a minimum of 6.5 feet + 1 foot tail = 7.5 feet of yarn. I would want a bobbin for this since it is more than 3 feet.
Grandma Kathleen recommends only stranding (carrying a piece of yarn across the back of your work between colors) when you have 3 or fewer stitches in between. For example, most of the letters, there's less than a 3 stitch gap between colors, but on the middle of the belt, there's a 6-stitch gap. On two of my stockings, stranding between those colors caused the middle of the belt to be raised, not flat.
The video below shows examples of stranding and how you can carry more than 3 stitches across the back of the work without too many problems. Sometimes I have floats that are 10 stitches long, but they are twisted in, as the video shows from 10:40-the end.
This video below shows how to twist new colors together so that they don't leave gaping holes, especially when there's a straight up/down color change.
- Leave at least a 6 inch tail, you can weave ends in later (optional). The Kitchener/ toe Stitch video at the end of this post has a good demonstration of weaving in at the end of the video.
Note about how much yarn is needed for each section: for my gauge (about 6 stitches per inch), I use about a foot of yarn for every 10 stitches in the pattern (double rows). For example, to do the red for Santa's left shoulder, there are 25 stitches, so I would need a minimum of 2.5 feet of working yarn, plus a foot for 6 inches of tail on either side. I would need at least 3.5 feet of red yarn for that section. Another example: The black belt has less than 64 stitches, so I would need a minimum of 6.5 feet + 1 foot tail = 7.5 feet of yarn. I would want a bobbin for this since it is more than 3 feet.
Grandma Kathleen recommends only stranding (carrying a piece of yarn across the back of your work between colors) when you have 3 or fewer stitches in between. For example, most of the letters, there's less than a 3 stitch gap between colors, but on the middle of the belt, there's a 6-stitch gap. On two of my stockings, stranding between those colors caused the middle of the belt to be raised, not flat.
The video below shows examples of stranding and how you can carry more than 3 stitches across the back of the work without too many problems. Sometimes I have floats that are 10 stitches long, but they are twisted in, as the video shows from 10:40-the end.
This video below shows how to twist new colors together so that they don't leave gaping holes, especially when there's a straight up/down color change.
B. Instep: (start with 72 stitches total)
- 18 Stitches off each end to start the heel. You can place these on stitch holders or on a string of contrasting yarn, 36 stitches in the middle
- Stop pattern with 36 center stitches on one needle (row 73). You can put this on a long stitch holder if you'd like.
C. Heel:
- Combine both 18 heel stitches on one needle for a total of 36 and K&P for 3” from bottom of tree
- On last row of the 3 inches, P back for 20 stitches, P2 together, P 1, and turn
- K 6, K2 together, K 1, and turn
- P 7, P2 together, P 1, and turn
- K 8, K2 together, K 1, and turn
- Continue until all of the stitches are used, about 15-20 rows, and 15-20 stitches across(?).
D. Gusset:
- Pick up 23 - 30 stitches along the heel for the gusset on each side, depending on how much you want it to gather. More stitches will give more gathering. Fewer stitches will give a flatter appearance.
- Divide all Heel & Gusset stitches on 2 needles (either straight or circular needles)
- K&P, decreasing 1 stitch each side at next to last stitch of every row until even with front panel
E. Foot:
- Put onto 3 double ended needles (1 each back side, 1 for front panel) (or 2 sets of circular needles)
- Continue K around in a circle w/4th needle
- Dec 1 st on each side of the foot every row until 18 sts on each underside needle
- Then Knit stripe
- 4 White (boy) / Red (girl)
- 4 Green
- 4 White (boy) / Red (girl)
- Continue to K red (or white for girl) until foot is 8” long from the back of the heel
F. Toe:
Dec4=K2tog at each end of front & sides of back
(1) Dec 4 st in row
(4-5) K 4 rows plain
(6) Dec 4 “”
(7-9) K3 rows
(10) Dec 4
(11-13) K3 rows
(14) Dec 4
COLOR CHANGE
Boy: *WHITE toe*
Girl: *RED toe*
(1-2) K2 rows plain
Girl: *RED toe*
(1-2) K2 rows plain
(3) Dec 4
(4-5) K2 rows plain
(6) Dec 4
(7) K1 plain
Lastly, Dec 4 every row at sides of toe until you have 16 stitches total (8 stitches/4 stitches/4 st’s)
G. Weave Toe: (using yarn needle. K&P indicate how to insert needle- Kitchener Stitch. Not normal K&P)
- Front (instep) K – slide off
- Front P – Keep on
- Back P – Slide off
- Back K – Keep on
Sometimes when I do this it looks fantastic. Other times it turns out like purl on the outside. Not sure what went wrong there.
- Continue until the last stitch is on the needle. Then thread onto a sewing needle and push inside of the stocking and tie off.
Here's an example of this:
H. Finishing:
- Stitch eyes, nose, mouth onto Santa using the duplicate stitch, demonstrated in the video below

- Darn together back halves of top & gusset sides with mattress stitch. The video below has the best demonstration of the mattress stitch I've seen from 2:20-9:25
- Crochet the top loop
- Sew matching bias tape to top of stocking to keep top from curling
The end!!! Congratulations. That's all.
 |
| Complete stocking except for bias tape at top |